Cách fix lỗi bị mất Virus & threat protection trong Windows Security Windows 10/11
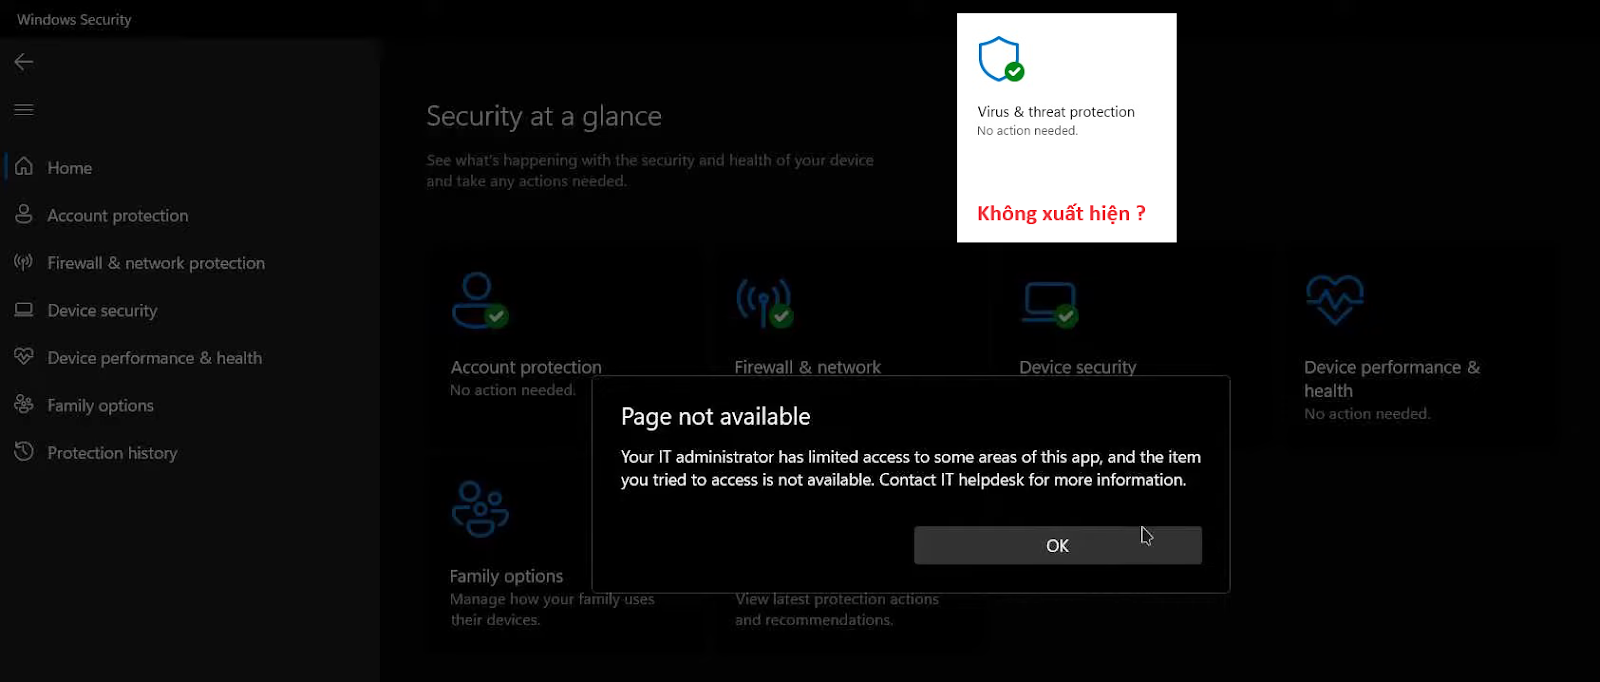
Chắc các bạn cũng gặp vấn đề đó là khi muốn tắt trình diệt virus để nhằm mục đích cài phần mềm hay làm một việc gì đó mà bị Windows Defender (Windows Security) chặn chả hạn thì để tắt nó chúng ta thường vào mục Virus & threat protection > Tắt Real-time.... Nhưng điều nan giải là bây giờ nó còn không hiện cái nút đó trong Windows Security để mà tắt nữa, cụ thể như hình dưới. Như vậy, mình sẽ tổng hợp cho bạn một số phương án sửa lỗi này nhé.
Cách 1: Đăng xuất tài khoản trường học/công việc (nếu có)
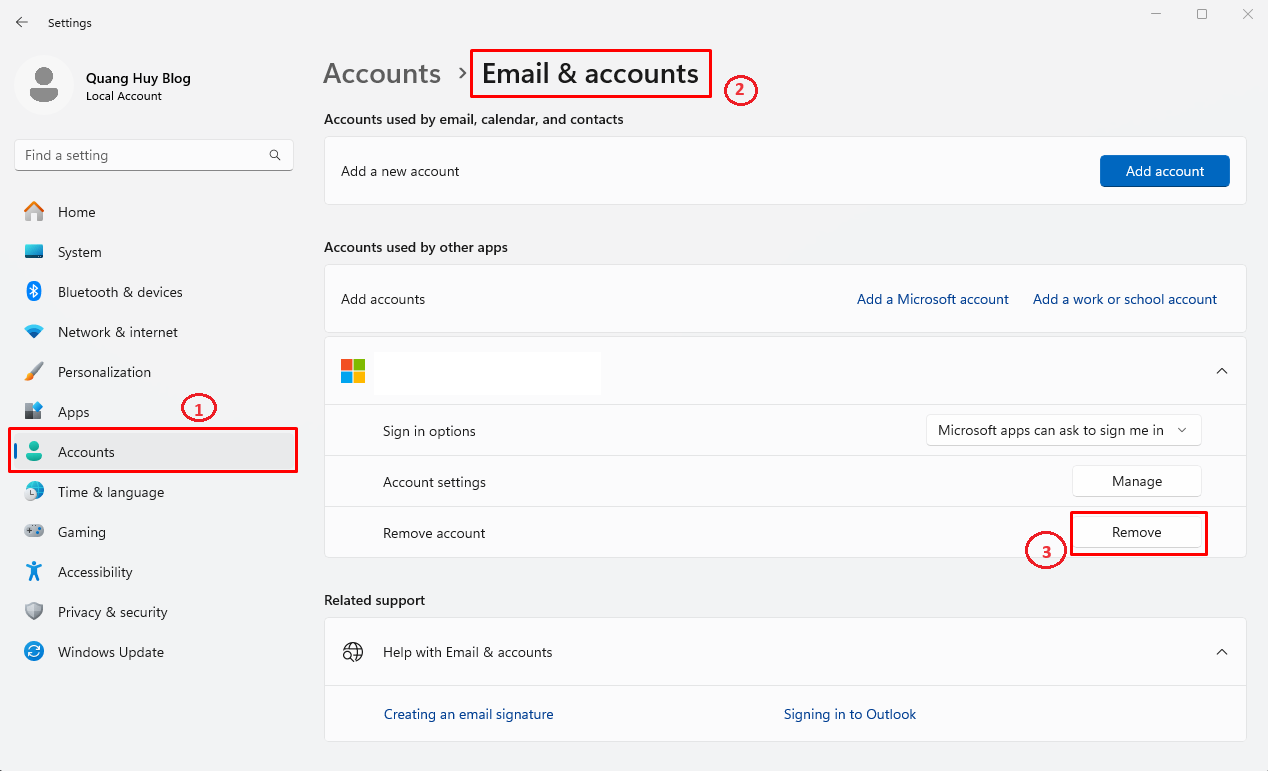
Các bạn truy cập vào Settings (Cài đặt), mở mục Accounts > Email & accounts rồi tìm đến tài khoản trường học hoặc công việc của bạn trước đăng nhập vào máy tính. Tiến hành nhấn Remove để xóa tài khoản khỏi máy tính và khởi động lại máy (Restart) xem kết quả nhé.
Cách 2: Sử dụng Powershell
Các bạn chuột phải vào nút Start > chọn Windows PowerShell (Admin) rồi tiến hành câu lệnh dưới, nhấn Enter để xem kết quả:
set-MpPreference -UILockdown 0

Cách 3: Dùng SecurityHealthSetup.exe
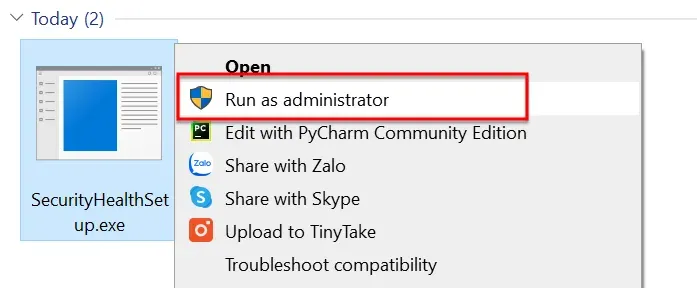
Các bạn tải file SecurityHealthSetup.exe tại đường link này, chạy dưới quyền Admin nhé: https://app.box.com/s/m637kd6le4kwdgdkh15c937l0blog31f.
Cách 4: Sử dụng Command Prompt
Tiến hành chạy Command Prompt (CMD) dưới quyền Admin, rồi sao chép toàn bộ câu lệnh dưới và nhấn Enter.
reg delete "HKLM\Software\Microsoft\Windows\CurrentVersion\Policies" /f
reg delete "HKLM\Software\Microsoft\WindowsSelfHost" /f
reg delete "HKLM\Software\Policies" /f
reg delete "HKLM\Software\WOW6432Node\Microsoft\Policies" /f
reg delete "HKLM\Software\WOW6432Node\Microsoft\Windows\CurrentVersion\Policies" /f
reg delete "HKLM\SOFTWARE\Policies\Microsoft\Windows Defender" /v DisableAntiSpyware
reg delete "HKCU\Software\Microsoft\Windows\CurrentVersion\Policies" /f
reg delete "HKCU\Software\Microsoft\WindowsSelfHost" /f
reg delete "HKCU\Software\Policies" /f
reg delete "HKLM\Software\Microsoft\Policies" /f
Cách 5: Sử dụng Registry Editor
- Nhấn tổ hợp phím
Win+R, nhập regedit rồi enter. - Truy cập theo đường dẫn sau:
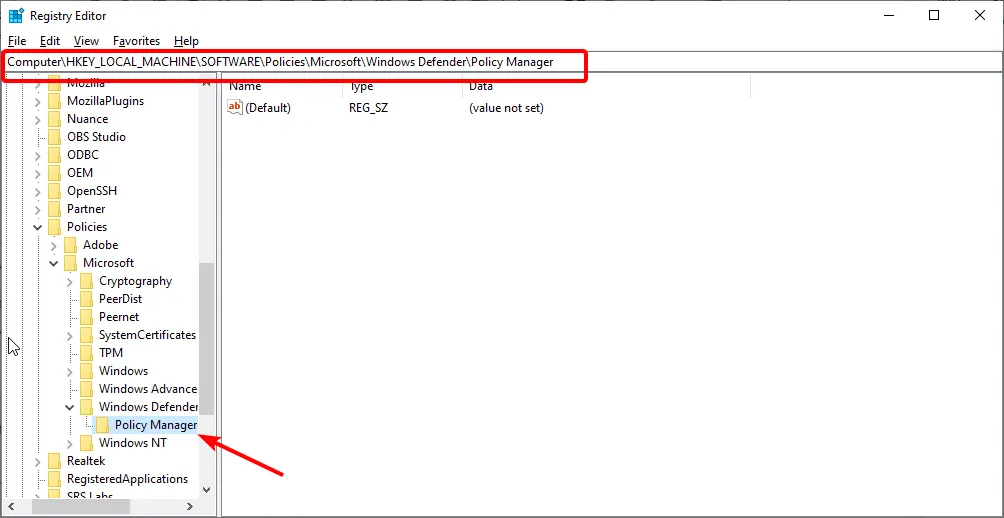
HKEY_LOCAL_MACHINE\SOFTWARE\Policies\Microsoft\Windows Defender\Policy Manager
- Chuột phải vào thư mục Police Manager, nhấn Delete để xóa tất cả mục trong đó.
- Khởi động lại máy và bật lại Windows Security xem kết quả nhé.
Cách 6: Sử dụng Group Policy Editor
- Nhấn tổ hợp phím
Win+R, nhập gpedit.msc rồi enter. - Truy cập đến đường dẫn sau:
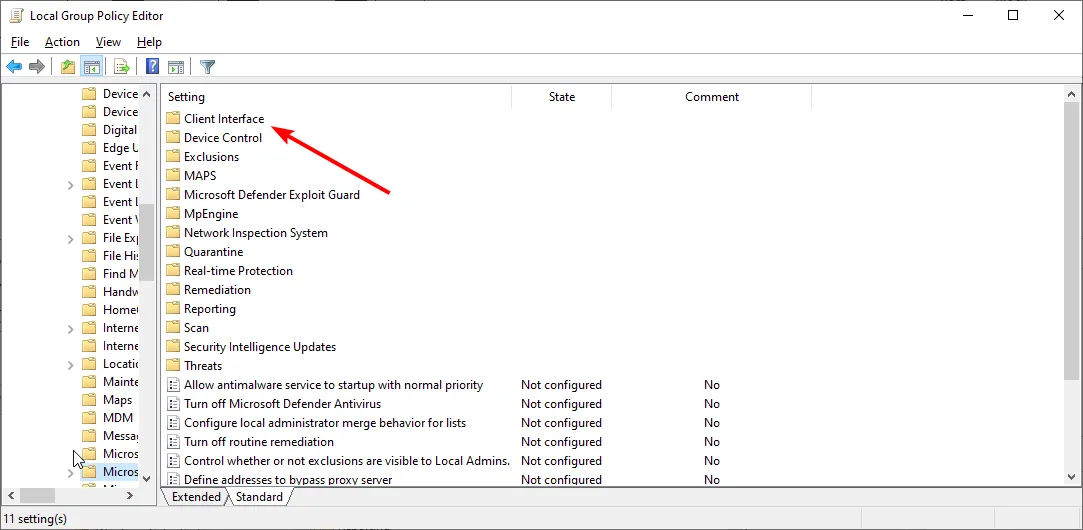
Computer Configuration > Administrative Templates > Windows Components > Microsoft Defender Antivirus
- Nhấn đúp vào Allow antimalware service to startup with normal priority.
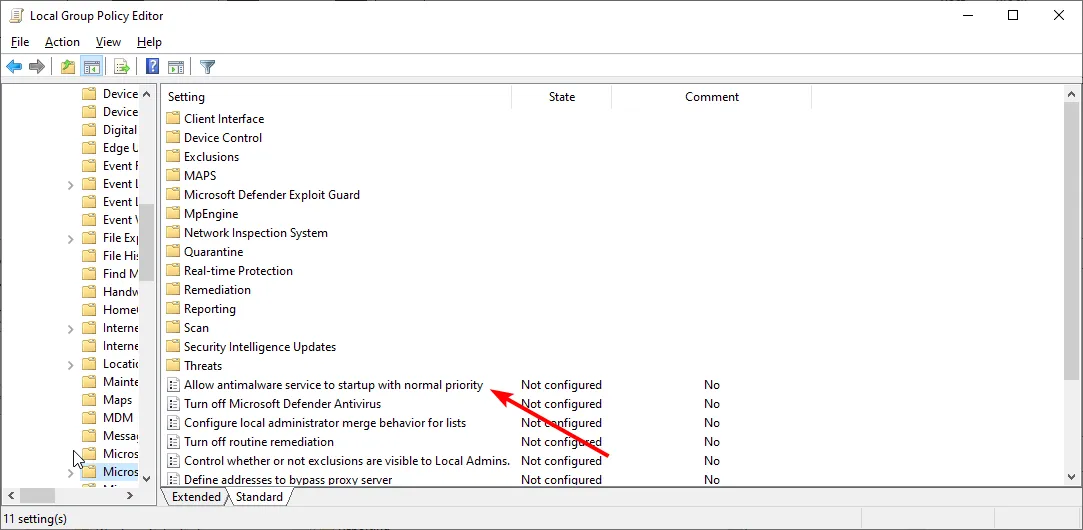
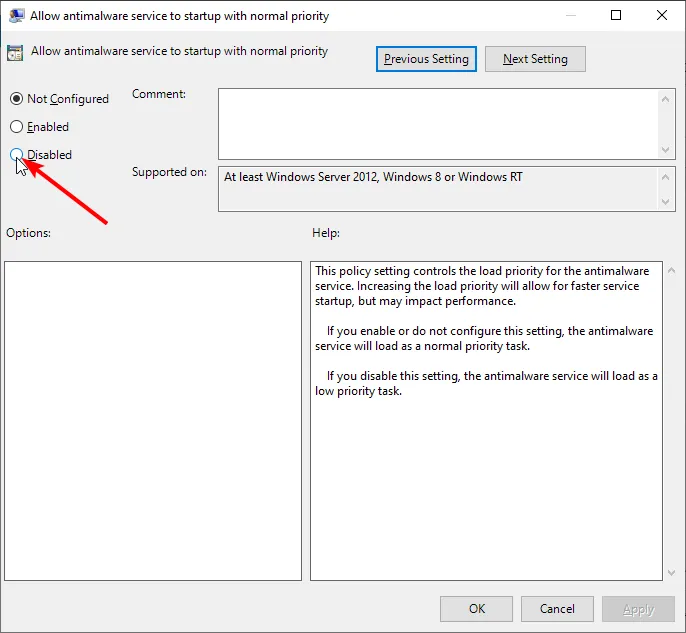
- Tích vào tùy chọn Disabled rồi nhấn OK để lưu.
- Tương tự, nhấn đúp vào Turn off Windows Defender Antivirus và tích chọn Disabled, nhấn OK.
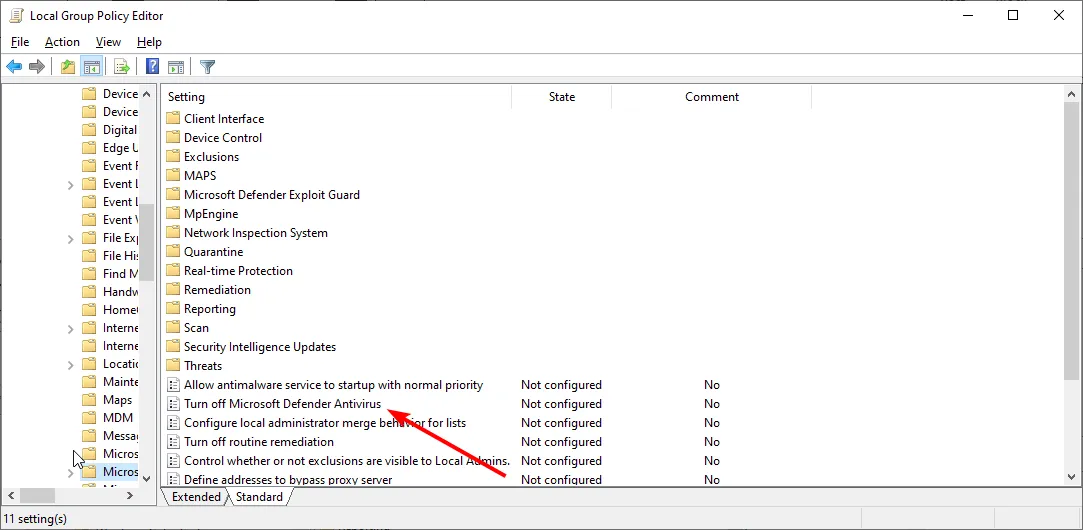
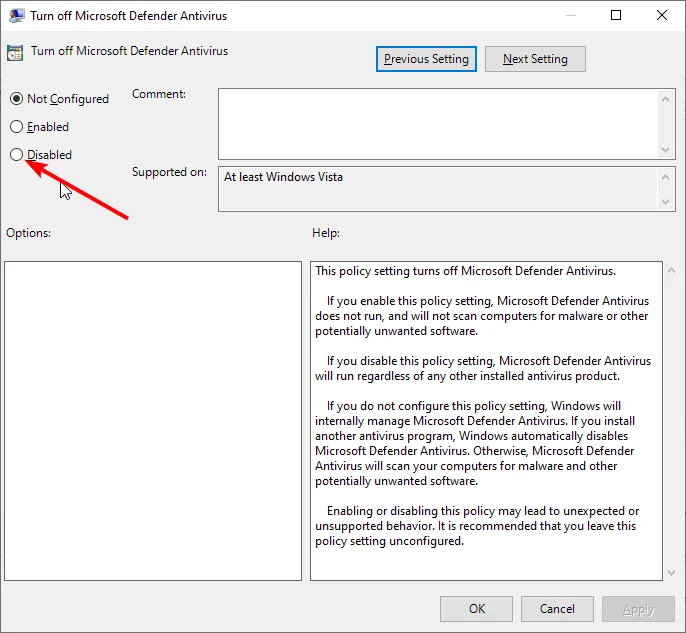
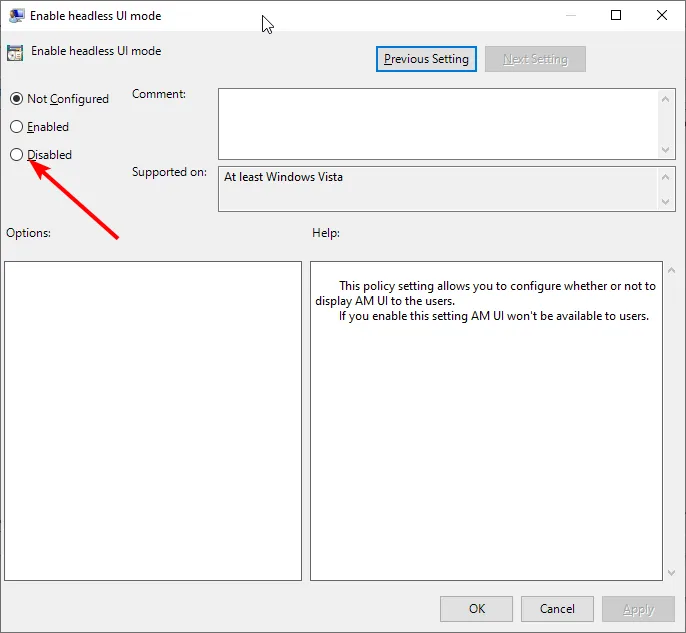
- Truy cập vào thư mục Client Interface, nhấn đúp vào Enable headless UI mode và tích chọn Disabled, nhấn OK là xong.
- Khởi động lại máy xem đã được chưa nhé.
Đó là tất cả những gì mình chia sẻ về Cách fix lỗi bị mất Virus & threat protection trong Windows Security Windows 10/11. Cảm ơn bạn đã đọc bài viết. Nếu có thắc mắc gì hãy để lại dưới phần Comment hoặc nhắn tin trực tiếp tới Zalo/Fanpage nhé!

- Nội dung bình luận phù hợp với phong tục và văn hóa Việt Nam.
- Vui lòng nhập tên và nhấn vào nút Thông báo cho tôi để nhận được thông báo phản hồi bình luận.
- Để bình luận dạng ảnh, bạn truy cập Upload ảnh tại đây.